Why You’ll Love This Recipe
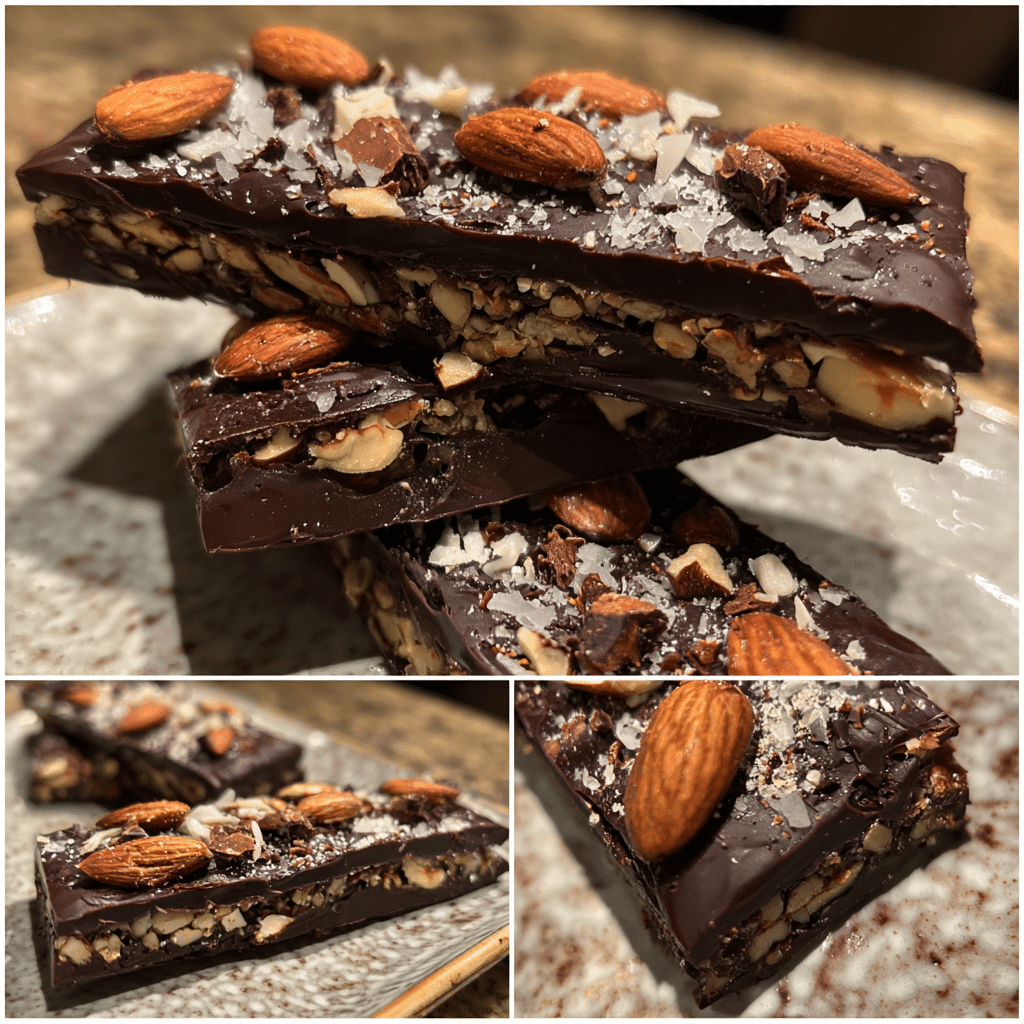
If you are someone who loves the irresistible combination of sweet, salty, and crunchy, these Dark Chocolate Sea Salt Nut Bars will quickly become your go-to treat. They are incredibly simple to prepare yet taste like something you might pick up from an upscale bakery. The richness of dark chocolate pairs beautifully with the nutty crunch, while the sprinkle of sea salt brings everything into balance. These bars are also versatile—you can enjoy them as a snack, dessert, or even a quick energy booster during a busy day. I personally love making a batch on Sunday evenings and keeping them in the fridge for the week ahead. They store well, taste amazing chilled, and always hit the spot when I’m craving something satisfying without being overly sweet.
Print
Dark Chocolate Sea Salt Nut Bars – A Perfect Balance of Sweet and Salty
- Total Time: 2 hrs 15 mins (including chilling time)
- Yield: 12 bars
- Diet: Vegetarian
Description
Rich and chewy nut bars made with dark chocolate, almonds, cashews, and pecans, topped with flaky sea salt for the perfect balance of sweet and salty.
Ingredients
- 2 cups mixed nuts (almonds, cashews, pecans)
- 2 cups dark chocolate chips or chunks
- 2 tbsp coconut oil
- 1/4 cup honey or maple syrup
- 1 tsp vanilla extract
- 1/2 tsp flaky sea salt (plus extra for topping)
Instructions
- Line an 8×8-inch baking dish with parchment paper.
- In a microwave-safe bowl, melt dark chocolate chips and coconut oil in 30-second intervals, stirring until smooth.
- Stir in honey (or maple syrup), vanilla extract, and sea salt.
- Fold in mixed nuts until evenly coated.
- Pour mixture into prepared dish and spread evenly.
- Sprinkle extra flaky sea salt on top.
- Refrigerate for at least 2 hours, or until firm.
- Cut into bars and store in an airtight container in the fridge.
Notes
- Toast nuts beforehand for extra flavor.
- Use different nut blends like hazelnuts, walnuts, or peanuts.
- For a softer texture, add 1/4 cup peanut butter to the chocolate mixture.
- Prep Time: 15 mins
- Cook Time: 0 mins
- Category: Snack
- Method: No-Bake
- Cuisine: American
Ingredients
(Tip: You can find the complete list of ingredients and their measurements in the recipe card below.)
Dark chocolate – The heart of this recipe. Choose a good quality dark chocolate bar or chips with at least 70% cocoa for a rich flavor and smooth texture. Dark chocolate not only adds decadence but also contains antioxidants, making these bars a slightly healthier indulgence.
Mixed nuts – Almonds, cashews, pecans, or walnuts all work beautifully. Nuts bring texture and a wholesome crunch. I like using a mix for variety, but you can stick to your favorites. Lightly toasting them beforehand enhances their flavor.
Sea salt – A light sprinkle of flaky sea salt is what transforms these bars. It cuts through the richness of the chocolate and highlights the nuttiness, giving every bite that sweet-salty balance.
Honey or maple syrup – This adds just a touch of natural sweetness and helps the nuts adhere together under the chocolate layer. If you prefer a deeper flavor, maple syrup is an excellent choice.
Coconut oil – Adding a small amount of coconut oil when melting the chocolate makes it smoother and easier to spread. It also gives a lovely shine when the chocolate sets.
Vanilla extract – A dash of vanilla brings a warm undertone that enhances the chocolate. It’s subtle but makes a noticeable difference.
Directions
Begin by lining an 8×8-inch baking pan with parchment paper to prevent sticking and make lifting the bars easier. Lightly toast the mixed nuts in a dry skillet over medium heat for 3–5 minutes until fragrant, then let them cool. In a large mixing bowl, combine the nuts with a drizzle of honey or maple syrup and stir until lightly coated. Spread this mixture evenly across the prepared baking pan.
Next, melt the dark chocolate with coconut oil in a heatproof bowl over simmering water (double boiler method) or in the microwave in 30-second intervals, stirring until smooth. Once melted, pour the chocolate evenly over the nut mixture, spreading it out with a spatula to ensure full coverage. Gently tap the pan to release any air bubbles.
Sprinkle the top generously with flaky sea salt, then place the pan in the refrigerator for at least 1–2 hours or until the chocolate has fully set. Once firm, lift the parchment paper out and cut into bars using a sharp knife. Store them chilled for best results, though they hold up well at room temperature for a short period.
Equipment needed
- 8×8-inch baking pan
- Parchment paper
- Heatproof bowl
- Small saucepan or microwave-safe bowl
- Mixing bowl
- Wooden spoon or spatula
- Sharp knife
Servings and timing
This recipe makes about 12 bars, depending on how large you cut them. Preparation time takes about 15 minutes, with an additional 1–2 hours for chilling. These are excellent for make-ahead snacks since they store so well.
Storage/reheating
Keep the bars in an airtight container in the refrigerator for up to 10 days. For longer storage, freeze them in a sealed container for up to 2 months. Thaw in the refrigerator overnight before serving. There’s no reheating required since these bars are meant to be enjoyed chilled or at room temperature.
Variations and Customizations
Nut-Free Option – Replace nuts with pumpkin seeds, sunflower seeds, or puffed rice for a crunchy bite without allergens.
Fruit-Infused Bars – Add dried cranberries, cherries, or raisins to introduce a sweet, chewy element.
Spiced Chocolate Twist – Mix a pinch of cinnamon, cayenne pepper, or cardamom into the melted chocolate for a unique flavor kick.
Layered Indulgence – Create a two-layer version by spreading a thin base of crushed graham crackers mixed with butter before adding the nut and chocolate layer.
Extra Crunch – Stir in crushed pretzels or granola to the nut mixture for added texture and salty contrast.
Nut Butter Swirl – Drizzle almond butter, peanut butter, or cashew butter on top of the melted chocolate and swirl with a toothpick for a marbled effect.
Coconut Lovers’ Bar – Sprinkle shredded coconut over the chocolate layer before chilling for tropical sweetness.
Protein Boost – Add a spoonful of protein powder to the melted chocolate for a satisfying post-workout snack.
Mint Infusion – Stir in a drop of peppermint extract to the chocolate for a refreshing after-dinner treat.
Double Chocolate Delight – Use a mix of dark and white chocolate, drizzling the latter over the top for a beautiful contrast.
FAQs
Can I use milk chocolate instead of dark chocolate?
Yes, but the bars will be sweeter and less intense in flavor.
Do I have to toast the nuts?
Toasting enhances flavor, but it is optional. You can use raw nuts if you prefer.
Can I make these bars vegan?
Yes, simply use maple syrup instead of honey and ensure your chocolate is dairy-free.
How do I prevent the chocolate from cracking when cutting?
Use a sharp knife and let the bars sit at room temperature for a few minutes before slicing.
Can I add protein powder?
Yes, mixing protein powder into the melted chocolate works well without changing the texture too much.
What’s the best chocolate percentage to use?
A chocolate with 70–80% cocoa is ideal for balancing bitterness and sweetness.
Can I double the recipe?
Absolutely, just use a larger baking pan and adjust chilling time slightly.
Are these bars gluten-free?
Yes, as long as your chocolate and add-ins are gluten-free.
How do I store them without the chocolate melting?
Keep them refrigerated or in a cool, dry place to prevent melting.
Can kids enjoy these bars?
Yes, though you may want to use milk chocolate or reduce the sea salt for a kid-friendly version.
Conclusion
Dark Chocolate Sea Salt Nut Bars are a simple yet elegant treat that brings together rich flavors and delightful textures. Whether you are making them as a healthy snack, a quick dessert, or a thoughtful homemade gift, they never disappoint. The recipe is highly adaptable, so you can tailor it to your tastes with different nuts, flavorings, or add-ins. Best of all, it requires minimal effort while delivering maximum satisfaction. I find that once you make these, they quickly become a household favorite—and a recipe worth keeping on repeat.
Hungry for more? Visit our website for full recipes and follow us on Pinterest for daily foodie inspo you’ll love to pin!