Why You’ll Love This Recipe
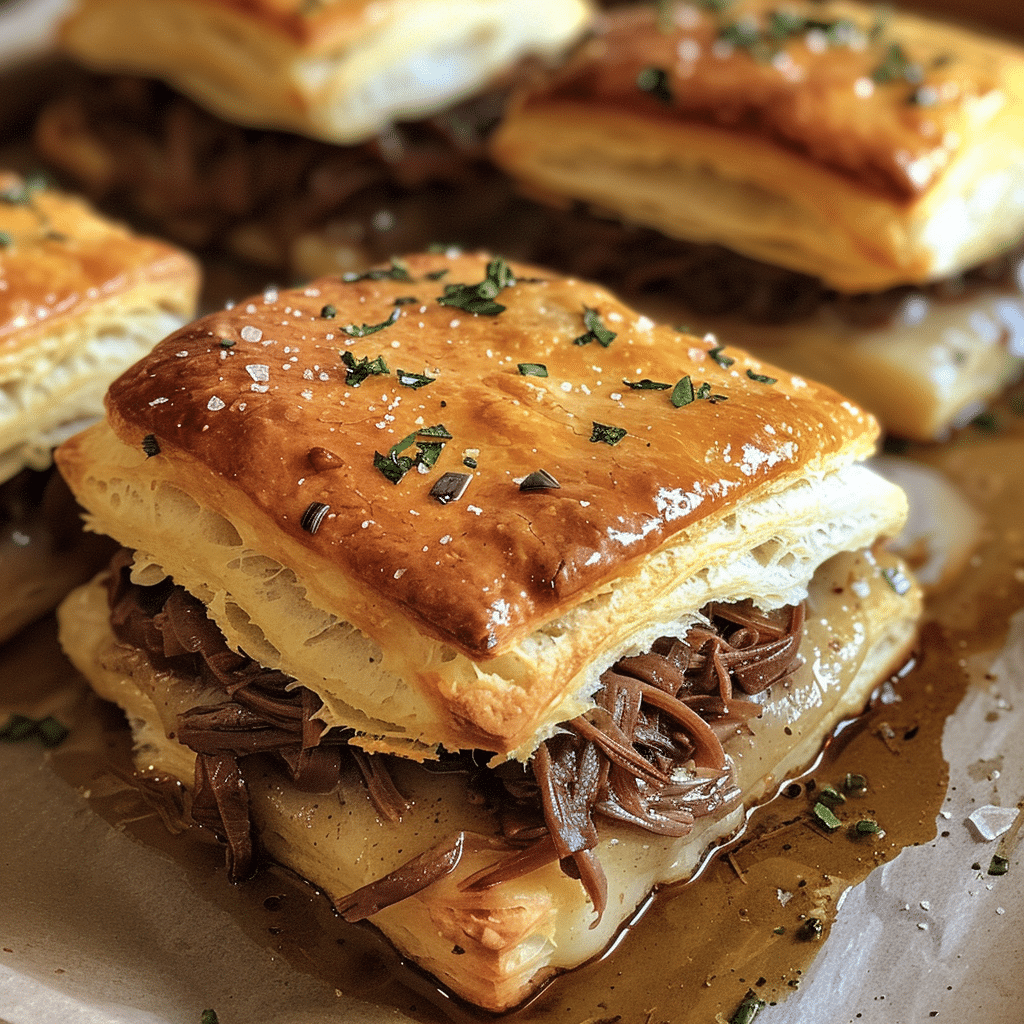
These baked biscuits take all the elements of a French dip sandwich and wrap them into a buttery, handheld treat. They’re flaky, cheesy, and loaded with juicy beef — all baked to golden perfection. Perfect for parties, game days, or quick dinners, they come together in minutes and taste like you’ve spent all day in the kitchen. Dip them into warm au jus and experience that classic French dip flavor in an irresistible new form.
Print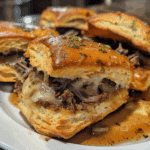
Baked French Dip Biscuits Recipe – A Savory Twist on a Classic Sandwich
- Total Time: 25 mins
- Yield: 8 stuffed biscuits
- Diet: Halal
Description
Baked French Dip Biscuits are a fun, handheld twist on the classic French dip sandwich. Flaky biscuits are stuffed with tender roast beef and melty provolone, then baked until golden brown and served with rich au jus for dipping — the ultimate warm, savory comfort snack or meal.
Ingredients
- 1 can refrigerated biscuit dough (8 large biscuits)
- 8 slices deli roast beef
- 4 slices provolone cheese, halved
- 2 tablespoons butter, melted
- 1 teaspoon garlic powder
- 1 teaspoon dried parsley (optional)
- For the Au Jus:
- 1 packet au jus gravy mix
- 3 cups water (or according to package instructions)
Instructions
- Preheat oven to 375°F (190°C) and line a baking sheet with parchment paper.
- Separate each biscuit in half horizontally to make two thinner rounds (16 total).
- On one half of each biscuit, layer a slice of roast beef and a half slice of provolone cheese. Top with the other biscuit half and press edges to seal.
- Place filled biscuits on the prepared baking sheet, seam-side down.
- Brush the tops with melted butter and sprinkle with garlic powder and parsley.
- Bake for 13–15 minutes, or until golden brown and puffed.
- Meanwhile, prepare au jus gravy according to the packet instructions.
- Serve the warm biscuits with cups of hot au jus for dipping.
Notes
- Add a smear of horseradish sauce or Dijon mustard inside the biscuit for an extra flavor kick.
- Use leftover pot roast or shredded beef for an even richer filling.
- To reheat, bake at 350°F for 5–7 minutes or air fry for 3 minutes.
- Perfect for game days, parties, or a cozy weeknight dinner.
- Prep Time: 10 mins
- Cook Time: 15 mins
- Category: Appetizer / Main Course
- Method: Baking
- Cuisine: American
Ingredients
(Tip: You can find the complete list of ingredients and their measurements in the recipe card below.)
Refrigerated Biscuit Dough: The flaky, buttery base that makes this recipe quick and easy.
Roast Beef: Thinly sliced deli roast beef or leftover homemade roast beef — tender and savory.
Provolone or Swiss Cheese: Melts beautifully and adds creamy, nutty flavor.
Butter: Brushed on top for golden color and extra richness.
Garlic Powder: Adds a subtle savory touch to the butter topping.
Onion Powder (optional): Enhances that classic French dip flavor.
Fresh Parsley (optional): For garnish and a touch of freshness.
Beef Broth: The base for your au jus — rich, flavorful, and perfect for dipping.
Worcestershire Sauce: Deepens the flavor of the dipping sauce.
Soy Sauce: Adds saltiness and umami for an authentic French dip taste.
Black Pepper: Balances and rounds out the au jus.
Directions
Preheat your oven to 375°F (190°C). Line a baking sheet with parchment paper or lightly grease a muffin pan.
Separate the biscuit dough and gently flatten each piece into a small circle. Place a slice of roast beef and a piece of cheese in the center of each. Fold the edges up and pinch to seal, forming a small ball.
Arrange the stuffed biscuits seam-side down on the baking sheet or in muffin cups.
In a small bowl, melt butter and mix in garlic powder and onion powder. Brush this mixture generously over the tops of the biscuits.
Bake for 15–18 minutes, or until golden brown and puffed. Sprinkle with fresh parsley while warm if desired.
For the Au Jus Dipping Sauce
While the biscuits bake, combine beef broth, Worcestershire sauce, soy sauce, and black pepper in a small saucepan. Bring to a simmer and cook for 5 minutes to blend the flavors. Keep warm until ready to serve.
Serve the biscuits hot with a small bowl of warm au jus for dipping.
Essential Equipment
Must-Have Tools to Get Rolling
Here’s what you’ll want to have on hand:
Silicone Spatula – Durable, heat-resistant silicone spatula perfect for mixing, scraping, and spreading. Gentle on non-stick cookware and easy to clean.
Large pot – You’ll need this to boil the whole cabbage head and soften the leaves.
large bowl –Spacious, durable large bowl ideal for mixing, serving, or food preparation. Made from sturdy material and easy to clean.
Sharp knife – For coring the cabbage and slicing out the thick stem in each leaf. A paring knife works best.
Mixing bowl – A big bowl makes it easier to combine your meat and rice filling evenly.
Cutting board – For prepping cabbage leaves and rolling them like a pro.
9×13-inch baking dish – Ideal size to fit your rolled cabbage leaves snugly and prevent them from unraveling.
knife – A sharp, durable kitchen knife perfect for slicing, chopping, and dicing with ease.
Servings and timing
This recipe makes 8 biscuits, serving 4 people. Prep time is 10 minutes, baking time is 18 minutes, and total time is 28 minutes — perfect for a quick lunch or appetizer.
Storage/reheating
Store leftovers in an airtight container in the refrigerator for up to 3 days. Reheat in the oven at 350°F (175°C) for 6–8 minutes or in an air fryer for 3–4 minutes until crisp and warm. Avoid microwaving to keep the pastry flaky. The au jus can be stored separately and reheated on the stovetop.
Variations and Customizations
French Onion Biscuits
Add caramelized onions inside the biscuit for a sweet and savory twist.
Cheesy Garlic Version
Mix shredded mozzarella and garlic butter inside for extra melty richness.
Spicy Kick
Add a dash of horseradish sauce or spicy mustard to the filling.
BBQ Beef Biscuits
Swap the au jus for barbecue sauce and use cheddar cheese for a smoky version.
Turkey & Swiss Variation
Use roasted turkey and Swiss cheese for a lighter but equally delicious take.
Breakfast French Dip
Add scrambled eggs and cheddar with roast beef for a breakfast-ready version.
FAQs
1. Can I use homemade biscuit dough?
Yes — homemade dough will give a flakier, richer texture if you prefer to make it from scratch.
2. Can I use different cheese?
Absolutely — provolone, Swiss, mozzarella, or Gruyère all melt beautifully.
3. How do I keep the biscuits from opening while baking?
Pinch the seams firmly and place them seam-side down on the tray.
4. Can I make these ahead of time?
Yes — assemble and refrigerate for up to 6 hours before baking.
5. Can I freeze them?
Yes, freeze unbaked biscuits, then bake from frozen, adding 3–5 minutes to the baking time.
6. What’s the best meat for this recipe?
Thinly sliced deli roast beef or leftover pot roast works great.
7. Can I make the au jus thicker?
Add a teaspoon of cornstarch mixed with water and simmer until slightly thickened.
8. Can I air fry these?
Yes — air fry at 360°F (182°C) for 10–12 minutes until golden.
9. Can I use crescent roll dough instead?
Definitely — it gives a softer, flakier texture that’s equally delicious.
10. What can I serve with these biscuits?
Serve with a side salad, roasted veggies, or French fries for a complete meal.
Conclusion
Baked French Dip Biscuits are a fun and delicious twist on the traditional French dip sandwich. With buttery biscuits, melty cheese, savory beef, and warm au jus for dipping, they’re the ultimate comfort food made simple. Perfect for casual dinners, parties, or even a quick lunch, these bites pack all the flavor of a gourmet sandwich in a perfectly portable form. Warm, golden, and completely irresistible — they’ll be gone before they even cool!
Hungry for more? Visit our website for full recipes and follow us on Pinterest for daily foodie inspo you’ll love to pin!