Why You’ll Love This Recipe
This cake is a dream for anyone who loves the classic chocolate-peanut butter duo. The layers are moist and deeply chocolatey, while the frosting is rich, creamy, and lightly salty for contrast. It’s easy to make from scratch with pantry staples and delivers a bakery-quality dessert right at home. Every layer — from the tender crumb to the luscious frosting — works in harmony, creating a dessert that’s as stunning as it is delicious.
Print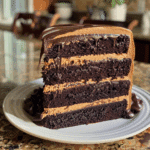
Chocolate Peanut Butter Layer Cake: The Ultimate Indulgent Dessert
- Total Time: 1 hr 15 mins (plus chilling time)
- Yield: 12 servings
- Diet: Vegetarian
Description
This Chocolate Peanut Butter Layer Cake is an indulgent dessert featuring rich, moist chocolate cake layers sandwiched with creamy peanut butter frosting and topped with a glossy chocolate ganache. It’s the perfect combination of salty and sweet for chocolate and peanut butter lovers alike.
Ingredients
-
- For the Chocolate Cake:
- 2 cups all-purpose flour
- 2 cups granulated sugar
- 3/4 cup unsweetened cocoa powder
- 2 teaspoons baking powder
- 1 1/2 teaspoons baking soda
- 1 teaspoon salt
- 1 cup buttermilk, room temperature
- 1/2 cup vegetable oil
- 2 large eggs
- 2 teaspoons vanilla extract
- 1 cup hot coffee or boiling water
-
- For the Peanut Butter Frosting:
- 1 cup unsalted butter, softened
- 1 cup creamy peanut butter
- 3 cups powdered sugar
- 1/4 cup heavy cream (plus more as needed)
- 1 teaspoon vanilla extract
-
- For the Chocolate Ganache:
- 1 cup semi-sweet chocolate chips
- 1/2 cup heavy cream
- 1 tablespoon butter (optional, for shine)
- Optional Toppings:
- Crushed peanuts
- Mini peanut butter cups
- Chocolate shavings
Instructions
- Preheat oven to 350°F (175°C). Grease and line three 8-inch round cake pans with parchment paper.
- In a large bowl, whisk together flour, sugar, cocoa powder, baking powder, baking soda, and salt.
- Add buttermilk, vegetable oil, eggs, and vanilla extract. Beat on medium speed for 2 minutes until smooth.
- Slowly mix in hot coffee or boiling water until fully incorporated (the batter will be thin).
- Divide batter evenly among the pans and bake for 30–35 minutes, or until a toothpick inserted in the center comes out clean.
- Cool cakes in the pans for 10 minutes, then transfer to a wire rack to cool completely.
- Meanwhile, make the frosting: beat butter and peanut butter together until smooth and creamy. Gradually add powdered sugar, mixing well. Add heavy cream and vanilla, beating until light and fluffy.
- For the ganache, heat heavy cream in a saucepan until just simmering. Pour over chocolate chips and let sit for 2 minutes. Stir until smooth and glossy. Add butter if desired.
- Assemble the cake: Place one cake layer on a plate, spread a thick layer of peanut butter frosting. Repeat with the second layer, then top with the third layer.
- Frost the top and sides with remaining peanut butter frosting. Pour cooled ganache over the top, letting it drip down the sides.
- Decorate with crushed peanuts or mini peanut butter cups. Chill for 30 minutes before slicing for cleaner cuts.
Notes
- Use creamy peanut butter for the best frosting texture — natural peanut butter may separate.
- The cake layers can be made a day ahead; wrap tightly and refrigerate before frosting.
- For extra flavor, sprinkle sea salt on top of the ganache.
- Store covered in the refrigerator for up to 4 days, or freeze slices for up to 2 months.
- Prep Time: 30 mins
- Cook Time: 35 mins
- Category: Dessert
- Method: Baking
- Cuisine: American
Ingredients
(Tip: You can find the complete list of ingredients and their measurements in the recipe card below.)
All-Purpose Flour: The structure of the cake, providing a soft and stable crumb.
Unsweetened Cocoa Powder: Gives the cake its deep, rich chocolate flavor — use Dutch-processed for a more intense color and smoother taste.
Baking Powder and Baking Soda: Work together to give the cake height and lightness.
Salt: Enhances the chocolate flavor and balances sweetness.
Granulated Sugar and Brown Sugar: The combination adds sweetness, moisture, and a slight caramel note.
Eggs: Bind the ingredients and contribute to the cake’s tender texture.
Buttermilk: Adds tang and moisture for that perfect soft crumb.
Vegetable Oil: Keeps the cake moist and tender.
Vanilla Extract: Deepens the overall flavor and complements both chocolate and peanut butter beautifully.
Hot Coffee or Hot Water: Intensifies the chocolate flavor and makes the batter smooth and pourable.
Peanut Butter: For the frosting — creamy peanut butter works best for smooth texture and rich flavor.
Butter: Provides structure and creaminess to the frosting.
Powdered Sugar: Sweetens and thickens the peanut butter frosting to a fluffy consistency.
Heavy Cream or Milk: Softens the frosting and makes it easy to spread.
Chocolate Ganache (optional): A glossy, indulgent finish made with melted chocolate and cream.
Crushed Peanut Butter Cups or Peanuts (optional): For garnish and extra texture.
Directions
Preheat your oven to 350°F (175°C). Grease and line two 8-inch round cake pans with parchment paper.
In a large bowl, whisk together flour, cocoa powder, baking powder, baking soda, salt, granulated sugar, and brown sugar. In another bowl, whisk together buttermilk, eggs, vegetable oil, and vanilla extract.
Gradually add the wet ingredients to the dry ingredients, stirring until smooth. Slowly pour in the hot coffee (or water) and whisk until fully incorporated — the batter will be thin, which helps create a moist cake.
Divide the batter evenly between the prepared pans and bake for 30–35 minutes, or until a toothpick inserted in the center comes out clean. Cool the cakes in the pans for 10 minutes, then transfer to a wire rack to cool completely.
For the frosting, beat butter and peanut butter together until creamy and fluffy. Gradually add powdered sugar, one cup at a time, alternating with a splash of heavy cream. Beat until smooth and spreadable. Adjust consistency by adding more cream for softness or more sugar for firmness.
Place one cooled cake layer on a serving plate. Spread a generous layer of frosting on top, then place the second cake layer over it. Frost the top and sides of the cake evenly. For an extra flourish, drizzle chocolate ganache over the top and garnish with crushed peanut butter cups or chopped peanuts. Chill for 30 minutes before slicing for perfect layers.
Essential Equipment
Must-Have Tools to Get Rolling
Here’s what you’ll want to have on hand:
Silicone Spatula – Durable, heat-resistant silicone spatula perfect for mixing, scraping, and spreading. Gentle on non-stick cookware and easy to clean.
Large pot – You’ll need this to boil the whole cabbage head and soften the leaves.
large bowl –Spacious, durable large bowl ideal for mixing, serving, or food preparation. Made from sturdy material and easy to clean.
Sharp knife – For coring the cabbage and slicing out the thick stem in each leaf. A paring knife works best.
Mixing bowl – A big bowl makes it easier to combine your meat and rice filling evenly.
Cutting board – For prepping cabbage leaves and rolling them like a pro.
9×13-inch baking dish – Ideal size to fit your rolled cabbage leaves snugly and prevent them from unraveling.
knife – A sharp, durable kitchen knife perfect for slicing, chopping, and dicing with ease.
Servings and timing
This recipe makes about 10–12 servings. Prep time takes around 30 minutes, baking takes 35 minutes, and assembly takes 20 minutes, for a total of roughly 1½ hours.
Storage/reheating
Store the cake covered in the refrigerator for up to 5 days. Bring to room temperature before serving for the best flavor and texture. The frosted cake can also be frozen (whole or in slices) for up to 2 months — wrap tightly in plastic wrap and foil. Thaw overnight in the fridge before serving.

Variations and Customizations
Chocolate Ganache Drip
Melt chocolate and cream for a glossy ganache drizzle that makes the cake look irresistible.
Crunchy Texture
Fold chopped roasted peanuts into the frosting for extra crunch.
Salted Caramel Swirl
Add a layer of caramel sauce between the cake layers for extra indulgence.
Peanut Butter Mousse Filling
Mix whipped cream with peanut butter frosting for a lighter, airy filling.
Gluten-Free Version
Use a 1:1 gluten-free flour blend — the cake remains rich and moist.
Cupcake Conversion
Turn this recipe into cupcakes and top each with a swirl of peanut butter frosting and mini Reese’s cups.
FAQs
1. Can I use natural peanut butter?
It’s best to use creamy, shelf-stable peanut butter since natural varieties can make the frosting oily.
2. Can I make this cake ahead of time?
Yes, bake the layers a day ahead, wrap them tightly, and frost the next day.
3. Can I use water instead of coffee?
Yes, but coffee enhances the chocolate flavor without tasting like coffee.
4. Can I make this as a single-layer cake?
Yes, bake it in a 9×13-inch pan and adjust baking time to about 40 minutes.
5. What’s the best cocoa powder to use?
Dutch-processed cocoa gives a deeper flavor and darker color.
6. Can I reduce the sugar?
You can cut up to ¼ cup of sugar from the batter without affecting texture.
7. How do I make the frosting fluffier?
Beat for an extra 2–3 minutes to incorporate more air.
8. Can I use milk chocolate instead of dark for ganache?
Yes, but reduce the cream slightly to keep the texture thick and rich.
9. What’s the best way to slice clean layers?
Chill the cake for 30 minutes before cutting and use a warm, clean knife.
10. Can I use boxed cake mix?
Yes — prepare your favorite chocolate cake mix and focus on making the peanut butter frosting from scratch for a quick shortcut.
Conclusion
The Chocolate Peanut Butter Layer Cake is a dessert that never fails to impress — rich, moist, and layered with creamy, nutty perfection. It’s the ultimate treat for chocolate and peanut butter lovers, striking the perfect harmony between decadent and comforting. Whether it’s the centerpiece of a celebration or a well-deserved personal indulgence, every slice of this cake feels like a little luxury — the kind that satisfies both the soul and the sweet tooth.
Hungry for more? Visit our website for full recipes and follow us on Pinterest for daily foodie inspo you’ll love to pin!